Command Bar > Users
By default Onyx does not require you to enter any user names or to login to use the system. However, the nature of the data that is stored in Onyx means that many will want to limit the information that can be viewed and edited by their staff. For this reason Onyx allows you to assign user permissions.
To use the user permissions system you must first enable it by using the options screen and then ticking the option labeled 'Enable User Permissions'
When you first enable user permissions Onyx will ask you to decide upon a password that will be needed whenever you subsequently enable or disable user permissions. Please note that you decide upon this password (we do not supply it), if you later forget the password you can reset all passwords from the help menu, or send us a message in the message centre and we can remotely reset them for you.
Actually, before Onyx even gets to asking you to create a password it will first ask you to create a user (by default there is a user named 'General' which should be changed to something more meaningful to you) and to assign 'Edit Users' rights. This is needed because as soon as user permissions are enabled, you would not otherwise be able to edit other users.
Onyx will display the 'users' screen:
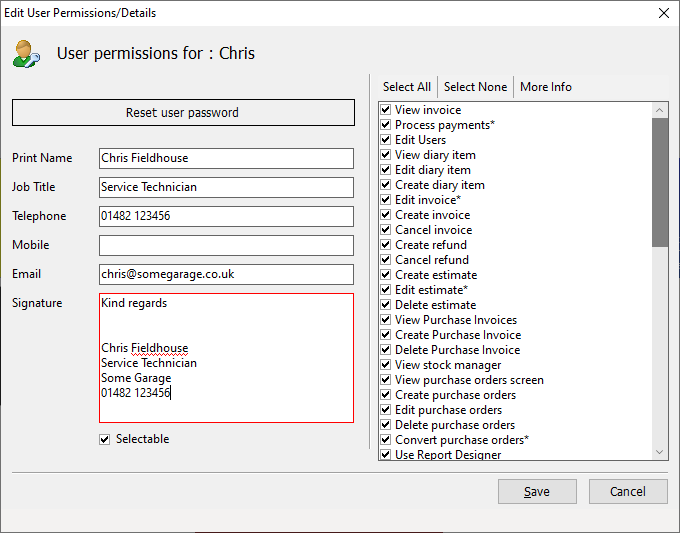
Here we have entered a user called Chris and selected him (note the blue background that shows our selection), we now press the 'Permissions' button so that we can set this user's permissions:
As can be seen 'Chris' has permissions to do everything (please note that we will extend the permissions as needed so the above image may not contain the full list), but if we wanted to prevent him from taking payments we would un-tick the 'Process Payments' permission. We can also reset Chris' password so that when he next logs in to Onyx he will be asked to provide a new password. Note that some permissions have an asterisk against them, this indicates that there is some additional information or condition that you will need to know, select the item in question and then press the 'More info' button to see this additional information.
Note, Selection means that the User Account will be available for selection from the various drop down lists in Onyx. If this is an account that is only used for API access, please untick this option. Signature anything entered here will be used in the signature field when emailing printouts.
When a user tries to do something that he doesn't have a permission to do the following message will be displayed.
Once you have enabled user permissions you will find that you now need to login to Onyx before you can do any work. The login screen is shown below:
Here you enter your username and password to continue using Onyx, you also have the option to close onyx, open the SQL editor (which allows us to send you a script to reset user permissions if you forget your passwords) and to disable security if you know the main password.
When you have finished working on Onyx you should logout to keep it secure, this is done by pressing the 'Logout' menu item on the main screen:
|